Ubuntu 20.04 下安装运行 GPGPU-Sim
0. 前言
最近因为课程 Project 需要使用 GPGPU-Sim 复现一篇 paper,在之后的课题中可能也会用到这个模拟器。所以收集了相关资料以搭建 GPGPU-Sim 的环境并运行 Demo。GPGPU-Sim 的参考资料实在是不多,主要参考了官方文档、Github 中 README 文件,还有一些相关的 Blog。
本次只跑了一个非常简单的 Demo,关于 CUDA 实例可以参考 Textbook 《CUDA by Example》。里面提供了一些 CUDA 编程的源码介绍。有人在 Github 上提供了《CUDA by Example》的源代码。
不过自己搭建 GPGPU-Sim 的环境坑比较多,一定要注意 gcc/g++ 版本问题以及链接库。所以我个人还是建议如果不是长期使用,可以直接下载官方提供的 fully setup virtual machine 。在 http://gpgpu-sim.org/ 下载,然后导入 Virtual Box 使用。他们提供的虚拟机已经配置好了环境,可以直接使用 GPGPU-Sim 编译 .cu 文件然后在模拟器上运行。具体步骤可以参考 UCR 给的流程。
1. 介绍
GPGPU-sim能够在Linux系统下,提供对GPU的功能模拟和性能仿真,让你在没有装NVIDIA显卡的情况下可以编译并运行CUDA程序。当然它更重要的意义是,可以通过修改仿真参数,让开发者修改GPU内部架构,并进行性能仿真,以针对自己的项目需求进行更好的代码设计,获得更好的性能表现。
我使用的环境是
- Ubuntu 20.04
- CUDA Toolkit 11.1
- gcc/g++ 5
- ⚠️ 注意:在 Build GPGPU-Sim 之前最好就确保使用 gcc/g++ 5 版本
- 当时 GPGPU-Sim 作者测试时使用的是 CUDA 4.2 版本,gcc/g++也是 4.X 版本。
- 我使用 gcc/g++ 9 编译 .cu 得到的可执行程序在模拟器上运行会报错: Segmentation Fault. 使用 gcc/g++ 5 版本重新 Build 模拟器并编译后才正常运行。
2. 环境搭建
2.1 Dependencies
官方给出了需要的环境
GPGPU-Sim Dependencies
- gcc
- g++
- make
- makedepend
- xutils
- bison
- flex
- zlib
- CUDA Toolkit
GPGPU-Sim documentation dependencies
- doxygen
- graphvi
AerialVision Dependencies
- python-pmw
- python-ply
- python-numpy
- libpng 12-dev
- python-matplotlib
如果您正在使用Ubuntu,以下命令将安装除 CUDA 工具包之外的所有必需的依赖项。 所以我们直接用以下命令行安装所有需要的依赖。
GPGPU-Sim dependencies:
sudo apt-get install build-essential xutils-dev bison zlib1g-dev flex libglu1-mesa-devGPGPU-Sim documentation dependencies:
sudo apt-get install doxygen graphvizAerialVision dependencies:
sudo apt-get install python-pmw python-ply python-numpy libpng12-dev python-matplotlibCUDA SDK dependencies:
sudo apt-get install libxi-dev libxmu-dev libglut3-dev2.2 CUDA安装
这里讲一下 CUDA Toolkit 的安装过程
I. CUDA官网下载对应的包
- 进入CUDA官网[https://developer.nvidia.com/zh-cn/cuda-downloads]
- 根据自己的系统选择,建议下载runfile文件,官网给出了命令行操作
$ wget https://developer.download.nvidia.com/compute/cuda/11.1.0/local_installers/cuda_11.1.0_455.23.05_linux.run
$ sudo sh cuda_11.1.0_455.23.05_linux.run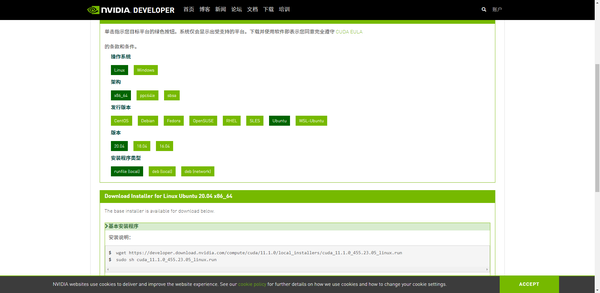
CUDA官网下载对应的包
- 在这一界面输入 accept 继续

输入 accept
- 安装CUDA工具包时如果电脑上没有GPU无需安装Driver,用叉号进行选择,仅勾选 CUDA Toolkit 即可,然后Install回车
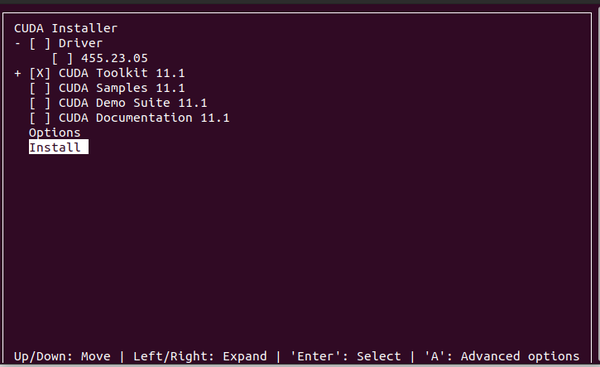
勾选Toolkit后 Install
- 之后会弹出一个带有 Summary 的界面,表示安装成功
II. 配置环境变量
- 命令行输入sudo gedit ~/.bashrc
- 在文件尾部插入如下命令,注意要去 ./usr/local 中核对一下cuda文件的名称,我这里是cuda-11.1为例
export CUDA_INSTALL_PATH=/usr/local/cuda-11.1
export PATH=$CUDA_INSTALL_PATH/bin
export LD_LIBRARY_PATH=$LD_LIBRARY_PATH:/usr/local/cuda-11.1/lib64
在文件尾部插入命令后保存退出
III. 验证
- 输入nvcc -V验证是否安装成功,注意是大写的 V 查看版本信息
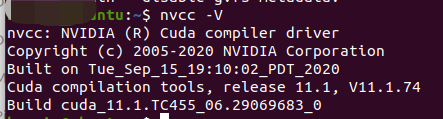
出现版本信息
3. GPGPU-Sim部署
3.1 安装 GPGPU-Sim
I. Clone GPGPU-Sim Repo
GPGPU-Sim使用从官方 git 地址 clone 的方式,Github一般能直接搜到
https://github.com/gpgpu-sim/gpgpu-sim_distribution
$ git clone https://github.com/gpgpu-sim/gpgpu-sim_distributionII. 部署GPGPU-Sim
进入clone项目代码的文件夹,打开命令行,执行以下命令
source setup_environment弹出 setup_environment succeeded
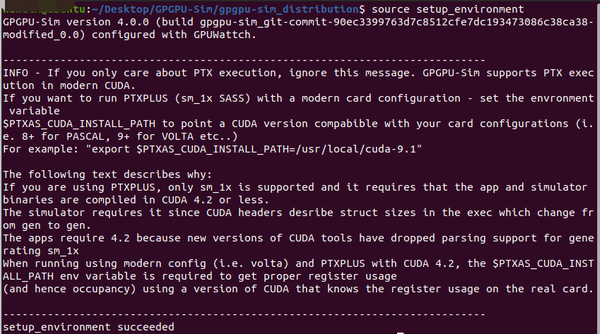
setup_environment succeeded
然后执行以下命令
make
make docs
这部分的作用是 Build Simulator,可以参考官方文档 README 中的 Step 2 来了解细节。
3.2 Run
从安装好到运行这一步还真不容易,再次感叹 GPGPU-Sim 的相关资料太少了。花了一些时间去了解 CUDA,去看官方文档,这里给出运行的 Demo 实例。来自博客
/* file: hello.cu */
#include <stdio.h>
#include <cuda_runtime.h>

__global__ void add(int a, int b, int *c)
{
    *c = a + b;
}

int main()
{
    int c;
    int *dev_c;
    cudaMalloc((void **)&dev_c, sizeof(int));
    add<<<1, 1>>>(2, 7, dev_c);
    cudaMemcpy(&c, &dev_c, sizeof(int), cudaMemcpyDeviceToHost);
    printf("2 + 7 = %d\n", c);

    return 0;
}
I. 编译
Before we run, we need to make sure the application’s executable file is dynamically linked to CUDA runtime library. This can be done during compilation of your program by introducing the nvcc flag “–cudart shared” in makefile (quotes should be excluded).
- 编译程序时指定–cudart shared确保可执行程序动态链接到CUDA runtime库
nvcc --cudart shared -o hello hello.cuII. 链接
To confirm the same, type the follwoing command: ldd <your_application_name>
本文 3.1 -> II 中已经通过source setup_environment设置可执行程序连接到GPGPU-Sim编译的libcudart.so中。 运行ldd确保链接正确的libcudart.so:
ldd hello❗️❌之前没有链接到正确的 libcudart.so
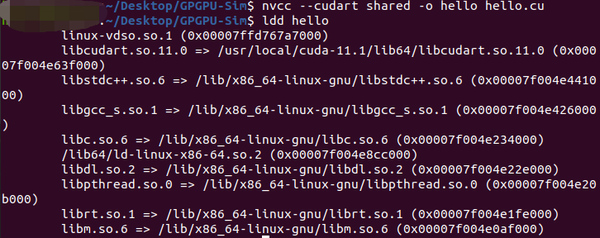
没有链接到 GPGPU-Sim 中的 libcudart.so 文件
You should see that your application is using libcudart.so file in GPGPUSim directory.
✔️ 您应该看到您的应用程序正在使用 GPGPUSim 目录中的 libcudart.so 文件
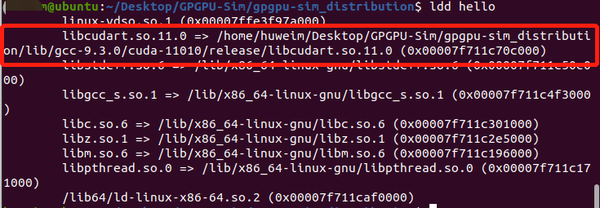
成功链接到 GPGPU-Sim 中的 libcudart.so 文件
链接到 GPGPU-Sim 中的 libcudart.so 文件
III. 拷贝 Config 文件
Copy the contents of configs/QuadroFX5800/ or configs/GTX480/ to your application’s working directory. These files configure the microarchitecture models to resemble the respective GPGPU architectures.
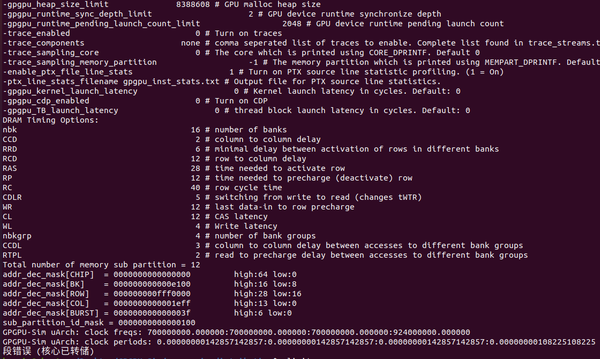
⭐️运行程序之前需要拷贝 GPGPU-Sim 路径下的configs/tested-cfgs/SM2_GTX480/的配置文件到当前运行 demo 的路径下。
Now To run a CUDA application on the simulator, simply execute source setup_environment <build_type> Use the same <build_type> you used while building the simulator. Then just launch the executable as you would if it was to run on the hardware. By running source setup_environment <build_type> you change your LD_LIBRARY_PATH to point to GPGPU-Sim’s instead of CUDA or OpenCL runtime so that you do NOT need to re-compile your application simply to run it on GPGPU-Sim.
通过运行 source setup_environment release,将 LD_LIBRARY_PATH 更改为指向 GPGPU-Sim 而不是 CUDA or OpenCL
IV. Run
最后运行可执行程序:
./hello❌ 此时出现了 Segementation fault,这个应该是编译器版本的问题引起的,如前所述,一开始我使用的 gcc/g++ 9
使用gcc/g++ 9编译出来的文件运行报错
在官方 Github 下面找到了解决方法,有人建议使用 gcc-5.4/g++-5.4 build the simulator,然后使用 gcc-4.4 编译 CUDA code。这样非常麻烦。
我的解决方法 是将 gcc/g++ 9 版本降为 gcc/g++ 5 版本,可以参考 gcc/g++版本切换 。如果一开始就是用 gcc/g++ 5 版本应该不会出现这个问题。
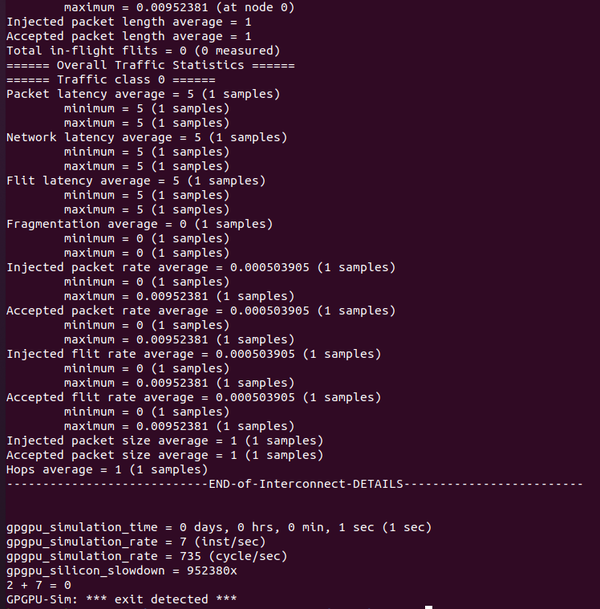
成功运行,不过结果有问题QAQ
算是成功在 GPGPU-Sim 上运行了 Demo
更新
2021-08-16 20:59:32 更新:
结果有问题还是之前对 C 语言的指针部分没理解到位,经评论区 @原子 提醒,将 cudaMemcpy(&c, &dev_c, sizeof(int), cudaMemcpyDeviceToHost) 改为 cudaMemcpy(&c, dev_c, sizeof(int), cudaMemcpyDeviceToHost) 即可。
或者都使用指针,如下
/* file: hello.cu */
#include <stdio.h>
#include <cuda_runtime.h>

__global__ void add(int a, int b, int *c)
{
    *c = a + b;
}

int main()
{
    int *c;
    c = (int*)malloc(sizeof(int));
    int *dev_c;
    cudaMalloc((void **)&dev_c, sizeof(int));
    add<<<1, 1>>>(2, 7, dev_c);
    cudaMemcpy(c, dev_c, sizeof(int), cudaMemcpyDeviceToHost);
    printf("2 + 7 = %d\n",*c);

    return 0;
}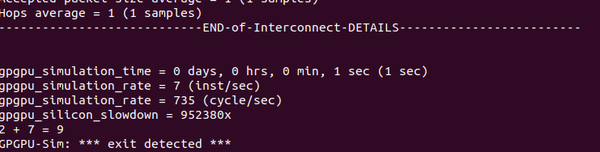
正确结果
Reference
- [https://blog.csdn.net/NKU_Yang/article/details/114662776?utm_medium=distribute.pc_relevant.none-task-blog-baidujs_title-1&spm=1001.2101.3001.4242] GPGPU-sim环境搭建教程
- https://www.gpuinsight.com/gpgpusim_install/ GPGPU-Sim 安装过程
- http://gpgpu-sim.org/manual/index.php/Main_Page 官方手册
- https://github.com/gpgpu-sim/gpgpu-sim_distribution Github 源码
- http://www.danielwong.org/classes/ee260-w17/assignment1 UCR
- https://blog.csdn.net/EternallyAccompany/article/details/108865331 gcc/g++版本切换
- https://github.com/gpgpu-sim/gpgpu-sim_distribution/issues/73